During the early 10s Netflix was the king of media entertainment. It was the first platform that offered a wide range of movies and series for a small monthly fee. It was revolutionary and it changed the way we consume media. But as time passed, Netflix started to lose its charm. The subscription fee increased rapidly, the content wasn’t as interesting as before and more and more companies started entering the game. Disney, HBO, ESPN, all started having their own subscription plans and hosted their content on their own platforms. Furthermore, password sharing crackdowns increased and people couldn’t divide the cost of the subscriptions. That’s when, people started looking on alternative options for watching their favorite TV show or movie, and self hosting started reappearing on the horizon. In this blog, we will talk about self hosting and how you could run your own self hosting media stack. We will be working on Ubuntu but the steps will be fairly similar to any os system. Let’s talk about it more in depth!
Disclaimer
I don’t condone or encourage downloading, sharing, seeding, or peering of copyrighted material. Such activities are illegal under international laws. This article is intended for educational purposes only. Please ensure you comply with your local laws and only use these tools for content you legally own or have the rights to access.
What is self hosting
Self hosting means hosting your apps on your own server. It is great if you want to keep your data private and have the full control of them. In order to host your own apps all you need is a pc/laptop (preferably with Ubuntu installed). Your old laptop or pc could be a great fit for such case. Why wouldn’t you use your current pc? Well, you could but the pc needs to be always on in order to access your apps. Furthermore it will use your pc’s resources and storage in order to function, which might not be bad if you have 1 or 2 apps running, but when we are talking about multiple apps this may cause an issue. Now that we have mentioned a few things about self hosting, let’s talk about today’s project.
Media stack
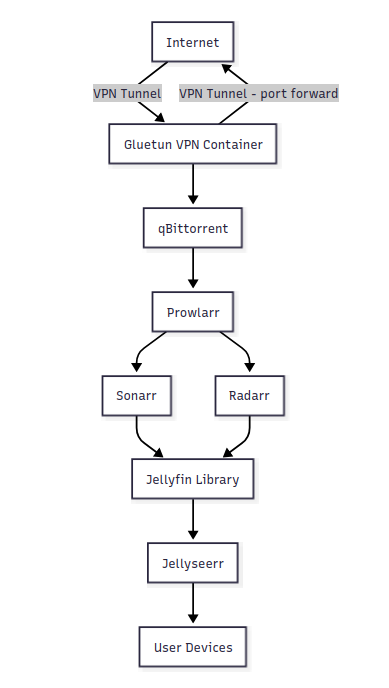
The media stack we will be using consists of
- vpn (using gluetun)
- qbittorent
- prowlarr
- sonarr
- radarr
- jellyfin
- jellyseerr
The project we will be following is the media stack by navilg
Docker
Docker is a platform as a service products that use OS-level virtualization to deliver software in packages called containers. In simpler words, you can define an app inside a docker, with its variables, os needs and versions, “containerize” and distribute it to any pc you want, without fearing that it won’t work. What it does is defining the exact parameters that are needed in order for the app to work, so that if you run the app on another pc with different parameters, apps, or versions of apps, the docker app will use the parameters given by the container and run it without any issues. This is really important for app development. Engineers are no longer afraid of ‘but it worked on my pc’ cases that are a result of a different package, version or variable set between different pcs. You can learn more about it on the official docker site
Vpn
VPN (Virtual Private Network) is a way for anyone to access the internet without using his/her real IP. You are connecting to another pc/server and it makes the requests you ask for example visiting YouTube or Spotify or any other website. The apps will only know the server’s IP, not yours. This means that they can’t identify you and connect you with the request you made. VPN is not a company nor an app, it’s a technology that create a secure connection with a server. This means that you don’t need to pay a company to use VPN, you just need two pcs to create a VPN connection. But then. why do we pay companies for using a VPN. Well, for providing us with the access to their servers, for ensuring a stable, fast and secure connection and for not storing our data (no logs policy). Remember, using a friend’s pc for a vpn connection, means that your friend will know that you connected to his/her pc and the ip that the apps will see for the requests will be your friends. In order to be secure on the internet, you don’t want to endanger your friend. That is why we use VPN companies. The are multiple companies and some of them have free plans, but i would recommend paying something and searching for notable companies in order to have your mind at peace. Some of the most notable apps are NordVPN, ProtonVPN, Mullvad. You can check PC Mag’s Best VPN Services for 2025 to find out more info about each option
Torrents
Some of you might have heard about torrents and torrenting. Most of you have linked it with the 7 seas. I don’t blame you, it’s only logical to do so when all you hear is how you can pirate apps, tvs, movies in such way. But torrenting shouldn’t scare you. BitTorrent is a communication protocol for peer-to-peer file sharing. It enables users to share files over the internet in a decentralized manner. You can learn more about it from Wikipedia. Now a torrent file is a file that contains metadata about files and folders to be distributed, and usually also a list of the network locations of trackers, which are computers that help participants in the system find each other and form efficient distribution groups called swarms. Torrent files are normally named with the extension .torrent. More on torrent files on Wikipedia. In other words, torrenting and torrents are just a way of downloading and uploading files. Instead of using one central server that you connect to download the data, you become part of a network that each client sends and receives data. Pretty amazing!!! A great example of a legal file that you can download via torrenting is the Ubuntu operating system. Now, it is true that people also use torrenting for illegal activities such as downloading of copyrighted material such as movies, tvshows, music and it is also a way of distributing malware, so you need to be careful from where and what you download. Always verify the source of a torrent and consider using tools like antivirus scanning or community comments to avoid harmful files.
*Arr apps
Lidarr, Prowlarr, Radarr, Readarr, Sonarr, and Whisparr are collectively referred to as “arr” or “arrs”. They are designed to automatically grab, sort, organize, and monitor your Music, Movie, E-Book, or TV Show collections for Lidarr, Radarr, Readarr, Sonarr, and Whisparr; and to manage your indexers and keep them in sync with the aforementioned apps for Prowlarr. More info Servarr wiki
Jellyfin
Jellyfin is the volunteer-built media solution that puts you in control of your media. You can stream from any device you want from your server. You connect jellyfin to your server and you have a way of accessing your photos, videos, music, shows, live tv and everything in between. You are control of your media. More info on their site
Jellyseerr
Jellyseerr is a free and open source software application for managing requests for your media library. It integrates with the media server of your choice: Jellyfin, Plex, and Emby. In addition, it integrates with your existing services, such as Sonarr, Radarr. It is something like a connector between Jellyfin (your media app) and the *arr apps that grab, sort and organize your media.
Getting ready to docker up
So after all the explanation about what each app does. Let’s get to the good part. Below is a graph of how will each app connect with the others.
GitHub download
First things first we need to download the media stack project we mentioned earlier. This is fairly simple, we will
- Go to the the media stack by navilg github page
- Click on Code and
- Copy url to clipboard. Then
- Open a cmd panel
- Type
git clone <url-we-copied>(If you don’t have git on your pc check out the git website for more info) - Go the folder by typing
cd media-stack - Open it using a text editor (e.g Visual studio code)
Vpn setup
What we will need is a vpn provider. As mentioned in Vpn section there are a number of apps that you can use. I personally use ProtonVPN. It is a Swiss based company with a really good reputation and the most important part is that it allows port forwarding. Port forwarding basically a port that you open in order for other clients to connect to your pc. This is crucial for torrenting since people need to be able to connect to you can ask for files that you are seeding. It is also really good from your end to have multiple connections. You can ask from these peers for a certain file that you want and they might have it. This doesn’t mean that if you don’t have port forwarding you cannot download files using torrents. but it will be harder since other clients will not be able to connect to you and you won’t offer back as much to the community.
There are 2 ways that you can connect with vpn provider using docker files. One is with OpenVPN and the second it with WireGuard. I won’t get in too much detail since I don’t have the necessary background. WireGuard is faster an newer in comparison to OpenVPN which has more broad support and is more mature since it is from 2001. For more info I would suggest checking this article from Bill Mann. We will be using WireGuard since it is faster. In order to use it we will need a WireGuard key. Each vpn provider has its own way of giving you the key. I am providing you with the ProtonVPN documentation on how to get your WireGuard key. For our key to work properly we will need to have port forwarding enabled. More info for each vpn provider can be found on gluetun vpn setup guide
From now on we will closely follow the instructions of navilg media stack README file. Please follow the instructions closely as well as my suggestions which might be useful along the way
As it is being mentioned, before deploying the stack, you must first create a Docker network:
docker network create --subnet 172.20.0.0/16 mynetwork
# Update the CIDR range based on your available IP range
This will be a network that our containers will use in order to communicate with each other.
As mentioned the docker-compose.yml file is using the OpenVPN protocol. This is ok if you don’t want to change a lot of things from the original file, but as I mention above, OpenVPN is slower in comparison to WireGuard, which is crucial for downloading files at mass especially when using a vpn provider, which is also slowing down you internet speed. If we are talking about a 100Mbps connection you might not see any big difference but for faster internet connections the difference will be significant.
Now you need to comment/uncomment the required lines in the file. The docker-compose.yml file includes clear instructions in the comments to guide you through the process.
Note: This is also a good time to change the volumes (folders) where your data will be saved. More importantly, you need to configure the torrents-downloads folders because this is where tvshows and movies will be saved. If you want to save them in a different disk, you need to mount it and the create the directory (folder) where your movies and series will be downloaded. To find out how to do it depending on your OS I suggest asking a LLM such as ChatGPT or Mistral.ai.
IMPORTANT : Given the fact that we want to use WireGuard instead of OPENVPN we need to change the vpn container a bit. You can check my docker compose file but below is how i changed my environment variables on vpn container
environment:
- VPN_SERVICE_PROVIDER=protonvpn
- VPN_TYPE=wireguard # or wireguard
- SERVER_COUNTRIES=
- WIREGUARD_PRIVATE_KEY=
- VPN_PORT_FORWARDING=on
- PORT_FORWARD_ONLY=on
- VPN_PORT_FORWARDING_UP_COMMAND=/bin/sh -c 'wget -O- --retry-connrefused --post-data "json={\"listen_port\":}" http://127.0.0.1:5080/api/v2/app/setPreferences 2>&1'
You need to configure the SERVER_COUNTRIES and WIREGUARD_PRIVATE_KEY. More info about the variables can be found in the official gluetun documentation
Running docker compose
If you didn’t change anything in the environment variables of the vpn then you will follow the command provided by navilg
VPN_SERVICE_PROVIDER=nordvpn OPENVPN_USER=openvpn-username OPENVPN_PASSWORD=openvpn-password SERVER_COUNTRIES=Switzerland RADARR_STATIC_CONTAINER_IP=radarr-container-static-ip SONARR_STATIC_CONTAINER_IP=sonarr-container-static-ip docker compose --profile vpn up -d

# OPTIONAL: Use Nginx as a reverse proxy
# docker compose -f docker-compose-nginx.yml up -d
In which you need to provide the radarr static ip (in the range of the mynetwork network that we created earlier), sonarr static ip, openvpn name and password
If you followed my configuration you will run
RADARR_STATIC_CONTAINER_IP=172.20.0.101 SONARR_STATIC_CONTAINER_IP=172.20.0.102 docker compose --profile vpn up -d
You can change the containers’ ips but this was my configuration.
Setting up the apps
From now on you need to follow the instructions of the navilg’s documentation. I will however point out a few things to know because errors may occur
qbittorent configuration
After you complete the configuration of qbittorent i would suggest running docker compose --profile vpn restart to be sure that the qbittorent can communicate with gluetun. You can check if everything is working as intended by following these commands
- Run
docker logs vpnto and find the ip and forwarded port of the vpn. - Go to qbittorent and check if there is a globe on the right down corner. It should look like
 . If there is a firewall ( a fire logo) then it is not working properly and I suggest to restart the containers
 - You can also check by visitng a port forwarding tester site like this one and fill your vpns ip and port.
- If you have checked everything else you can add the ubuntu torrent that we mentioned earlier and see if it is downloading and uploading. The uploading part might take some time before you can see that you upload so be patient. If at around 50% you haven’t uploaded anything but the globe in step 3 exists then i wouldn’t worry but you can restart if you want. If you have the fire logo then i suggest you restart your containers.
prowlarr config
When you reach to the point that you need to connect your sonarr and radarr remember to use the IPs that you defined when you started the containers for the first time. In my case they are 172.20.0.101 and 172.20.0.102.
FAQ
Here I try to solve some of the issues that you may encounter.
My vpn war working as intended but after some time it stopped working and qbittorent is showing the fire logo
No need to worry. I had this issue multiple times. The best solution is to restart the containers. Nothing will be lost except the download and upload total in the down right corner of qbittorent.
Jellyfin prompts me to choose a server and when i choose one to connect it says that it is unavailable
Most likely The Jellyfin web client may have corrupted session data. Clear browser cache (or try Incognito)
- Right Click
- Inspect
- Storage
- Click on the IndexedDB
- Right Click
- Delete Data
Final thoughts
I really hope i helped you setting up your first media stack. If you have any issues please send my an email and I will update the blog or try to solve your issue. Have fun watching your favorite tvshows and movies ☺️ ❤️